SEP Protocol Integration
SEP integrations that authenticate your ability to enable Fuap ecosystem.
SEP 10, 24, 6
SEP-1: Stellar TOML
The stellar.toml file is a common place where the Internet can find information about an organization’s Stellar integration. Regardless of which type of transfer we want to use (SEP-6 or SEP-24), we'll need to start with SEP-1.
For anchors, we’re interested in the CURRENCIES they issue, the TRANSFER_SERVER and/or TRANSFER_SERVER_SEP0024 keywords that indicate if the anchor supports SEP-6, SEP-24, or both, and the WEB_AUTH_ENDPOINT which allows a wallet to set up an authenticated user session.
BasicPay is interoperating with the testing anchor located at testanchor.stellar.org and you can view its toml file here.
/src/lib/stellar/sep1.js
import { StellarTomlResolver } from "stellar-sdk";

// Fetches and returns the stellar.toml file hosted by a provided domain.
export async function fetchStellarToml(domain) {
  let stellarToml = await StellarTomlResolver.resolve(domain);
  return stellarToml;
}
Source: https://github.com/stellar/basic-payment-app/blob/main/src/lib/stellar/sep1.js
Strictly speaking, the StellarTomlResolver function from the JavaScript SDK is the only function we need to retrieve and use the information provided by the anchor (heck, we could even just write our own fetch-based function, and bypass the SDK altogether). However, we've created quite a few "helper" functions to make the rest of our queries a bit more verbose and clear as to what we're looking for from the anchor server. Make sure to check out the sep1.js source file linked above!
Using the stellar.toml information for an asset with a home_domain, we can display to the user some options (depending on the available infrastructure). We'll start with SEP-10 authentication.
SEP-10: Stellar Web Authentication
Similar to the SEP-1 information, both SEP-6 and SEP-24 protocols make use of SEP-10 for authentication with the user. The user must prove they own the account before they can withdraw or deposit any assets as part of SEP-10: Stellar Web Authentication.
Since we have the stellar.toml file information already, we can use that to display some interactive elements to the user.
Prompt for authentication
NOTE
The /src/routes/dashboard/transfers/+page.svelte is doing a lot of work throughout these sections, and we are chopping it up in various ways for display as part of this tutorial. For a full picture of this file, please remember to check the source code.
// Some code

<script>
  // `export let data` allows us to pull in any parent load data for use here.
  /** @type {import('./$types').PageData} */
  export let data;

  // We import some of our `$lib` functions
  import { fetchStellarToml } from "$lib/stellar/sep1";

  // An object to easily and consistently class badges based on the status of
  // a user's authentication token for a given anchor.
  const authStatusClasses = {
    unauthenticated: "badge badge-error",
    auth_expired: "badge badge-warning",
    auth_valid: "badge badge-success",
  };

  // A simple function that checks whether a user has a SEP-10 authentication token stored for an anchor, and if it is expired or not.
  const getAuthStatus = (homeDomain) => {
    if ($webAuthStore[homeDomain]) {
      let token = $webAuthStore[homeDomain];
      if (webAuthStore.isTokenExpired(token)) {
        return "auth_expired";
      } else {
        return "auth_valid";
      }
    } else {
      return "unauthenticated";
    }
  };
</script>

<!-- HTML has been omitted from this tutorial. Please check the source file -->
Source: https://github.com/stellar/basic-payment-app/blob/main/src/routes/dashboard/transfers/+page.svelte
Requesting a challenge transaction
Now, when the user clicks the "authenticate" button, it triggers the auth function.

/src/routes/dashboard/transfers/+page.svelte
<script>
  /* This <script> tag has been abbreviated for simplicity */

  import { getChallengeTransaction } from "$lib/stellar/sep10";

  // We import any Svelte components we will need
  import ConfirmationModal from "$lib/components/ConfirmationModal.svelte";

  // The `open` Svelte context is used to open the confirmation modal
  import { getContext } from "svelte";
  const { open } = getContext("simple-modal");

  // Define some component variables that will be used throughout the page
  let challengeXDR = "";
  let challengeNetwork = "";
  let challengeHomeDomain = "";

  // Requests a challenge transaction from a SEP-10 server, and presents it to the user for pincode verification
  const auth = async (homeDomain) => {
    // Request the challenge transaction, expecting back the XDR string
    let { transaction, network_passphrase } = await getChallengeTransaction({
      publicKey: data.publicKey,
      homeDomain: homeDomain,
    });

    // Set the component variables to hold the transaction details
    challengeXDR = transaction;
    challengeNetwork = network_passphrase;
    challengeHomeDomain = homeDomain;

    // Open the confirmation modal for the user to confirm or reject the
    // challenge transaction. We provide our customized `onAuthConfirm`
    // function to be called as part of the modal's confirming process.
    open(ConfirmationModal, {
      title: "SEP-10 Challenge Transaction",
      body: "Please confirm your ownership of this account by signing this challenge transaction. This transaction has already been checked and verified and everything looks good from what we can tell. Feel free to double-check that everything lines up with the SEP-10 specification yourself, though.",
      transactionXDR: challengeXDR,
      transactionNetwork: challengeNetwork,
      onConfirm: onAuthConfirm,
    });
  };

  /* ... */
</script>

<!-- HTML has been omitted from this tutorial. Please check the source file -->
Source: https://github.com/stellar/basic-payment-app/blob/main/src/routes/dashboard/transfers/+page.svelte
As part of the auth function, BasicPay makes a GET request with an account param (the public key of the user) to the anchor, which sends back a Stellar transaction signed by the server's signing key (called a challenge transaction) with an invalid sequence number so it couldn't actually do anything if it were accidentally submitted to the network.
/src/lib/stellar/sep10.js
import { Utils } from "stellar-sdk";
import { fetchStellarToml } from "$lib/stellar/sep1";

// Requests, validates, and returns a SEP-10 challenge transaction from an anchor server.
export async function getChallengeTransaction({ publicKey, homeDomain }) {
  let { WEB_AUTH_ENDPOINT, TRANSFER_SERVER, SIGNING_KEY } =
    await fetchStellarToml(homeDomain);

  // In order for the SEP-10 flow to work, we must have at least a server
  // signing key, and a web auth endpoint (which can be the transfer server as
  // a fallback)
  if (!WEB_AUTH_ENDPOINT || !TRANSFER_SERVER || !SIGNING_KEY) {
    throw error(500, {
      message:
        "could not get challenge transaction (server missing toml entry or entries)",
    });
  }

  // Request a challenge transaction for the users's account
  let res = await fetch(
    `${WEB_AUTH_ENDPOINT || TRANSFER_SERVER}?${new URLSearchParams({
      // Possible parameters are `account`, `memo`, `home_domain`, and
      // `client_domain`. For our purposes, we only supply `account`.
      account: publicKey,
    })}`,
  );
  let json = await res.json();

  // Validate the challenge transaction meets all the requirements for SEP-10
  validateChallengeTransaction({
    transactionXDR: json.transaction,
    serverSigningKey: SIGNING_KEY,
    network: json.network_passphrase,
    clientPublicKey: publicKey,
    homeDomain: homeDomain,
  });
  return json;
}

// Validates the correct structure and information in a SEP-10 challenge transaction.
function validateChallengeTransaction({
  transactionXDR,
  serverSigningKey,
  network,
  clientPublicKey,
  homeDomain,
  clientDomain,
}) {
  if (!clientDomain) {
    clientDomain = homeDomain;
  }

  try {
    // Use the `readChallengeTx` function from Stellar SDK to read and
    // verify most of the challenge transaction information
    let results = Utils.readChallengeTx(
      transactionXDR,
      serverSigningKey,
      network,
      homeDomain,
      clientDomain,
    );
    // Also make sure the transaction was created for the correct user
    if (results.clientAccountID === clientPublicKey) {
      return;
    } else {
      throw error(400, {
        message: "clientAccountID does not match challenge transaction",
      });
    }
  } catch (err) {
    throw error(400, { message: JSON.stringify(err) });
  }
}
Source: https://github.com/stellar/basic-payment-app/blob/main/src/lib/stellar/sep10.js
Sign and submit the challenge transaction
In response, the user signs the transaction. You may have noticed we present this challenge transaction to the user with our regular confirmation modal. Once they've signed the transaction, the application sends it back to the anchor with a POST request. If the signature checks out, the success response will contain a JSON Web Token (JWT), which BasicPay stores in the webAuthStore store to use for future interactions with the anchor.
/src/routes/dashboard/transfers/+page.svelte
<script>
  /* ... */

  // We import any stores we will need to read and/or write
  import { invalidateAll } from "$app/navigation";
  import { walletStore } from "$lib/stores/walletStore";
  import { webAuthStore } from "$lib/stores/webAuthStore";

  // We import some of our `$lib` functions
  import {
    getChallengeTransaction,
    submitChallengeTransaction,
  } from "$lib/stellar/sep10";

  // Takes an action after the pincode has been confirmed by the user on a SEP-10 challenge transaction.
  const onAuthConfirm = async (pincode) => {
    // Sign the transaction with the user's keypair
    let signedTransaction = await walletStore.sign({
      transactionXDR: challengeXDR,
      network: challengeNetwork,
      pincode: pincode,
    });
    // Submit the signed tx to the SEP-10 server, and get the JWT token back
    let token = await submitChallengeTransaction({
      transactionXDR: signedTransaction.toXDR(),
      homeDomain: challengeHomeDomain,
    });
    // Add the token to our store
    webAuthStore.setAuth(challengeHomeDomain, token);
    // Reload any relevant `load()` functions (i.e., refresh the page)
    invalidateAll();
  };

  /* ... */
</script>

<!-- HTML has been omitted from this tutorial. Please check the source file -->
Source: https://github.com/stellar/basic-payment-app/blob/main/src/routes/dashboard/transfers/+page.svelte
The submitChallengeTransaction function is quite simple. We take the transaction (in XDR format) and the domain name, and submit it to the relevant WEB_AUTH_ENDPOINT provided by the home domain's stellar.toml file.
/src/lib/stellar/sep10.js
// Submits a SEP-10 challenge transaction to an authentication server and returns the SEP-10 token.
export async function submitChallengeTransaction({
  transactionXDR,
  homeDomain,
}) {
  let webAuthEndpoint = await getWebAuthEndpoint(homeDomain);

  if (!webAuthEndpoint)
    throw error(500, {
      message: "could not authenticate with server (missing toml entry)",
    });
  let res = await fetch(webAuthEndpoint, {
    method: "POST",
    mode: "cors",
    headers: { "Content-Type": "application/json" },
    body: JSON.stringify({ transaction: transactionXDR }),
  });
  let json = await res.json();

  if (!res.ok) {
    throw error(400, { message: json.error });
  }
  return json.token;
}
Source: https://github.com/stellar/basic-payment-app/blob/main/src/lib/stellar/sep10.js
About the webAuthStore store
webAuthStore storeLike so much of our BasicPay application, the various authentication tokens the user may have accumulated over time are stored in the browser's localStorage. There's not much special about this particular store, but here's how we put it together:
/src/lib/stores/webAuthStore.js
import { get } from "svelte/store";
import { persisted } from "svelte-local-storage-store";
import { Buffer } from "buffer";

function createWebAuthStore() {
  const { subscribe, update } = persisted("bpa:webAuthStore", {});

  return {
    subscribe,

    // Stores a JWT authentication token associated with a home domain server.
    setAuth: (homeDomain, token) =>
      update((store) => {
        return {
          ...store,
          [homeDomain]: token,
        };
      }),

    // Determine whether or not a JSON web token has an expiration date in the future or in the past.
    isTokenExpired: (homeDomain) => {
      let token = get(webAuthStore)[homeDomain];
      if (token) {
        let payload = JSON.parse(
          Buffer.from(token.split(".")[1], "base64").toString(),
        );
        let timestamp = Math.floor(Date.now() / 1000);
        return timestamp > payload.exp;
      } else {
        return undefined;
      }
    },
  };
}

export const webAuthStore = createWebAuthStore();
Source: https://github.com/stellar/basic-payment-app/blob/main/src/lib/stores/webAuthStore.js
Now that we have successfully authenticated our user with an asset anchor, we can display and process the various transfer capabilities of the anchor in question. We'll begin with SEP-6, since that will lay the groundwork for SEP-24 to follow.
SEP-6: Deposit and Withdrawal API
SEP-6 allows wallets and other clients to interact with anchors directly without the user needing to leave the wallet to go to the anchor’s site. In this integration, a user’s KYC information is gathered and handled by the wallet and submitted to the anchor on behalf of the user.
Find the anchor's TRANSFER_SERVER
TRANSFER_SERVERBefore we can ask anything about how to make a SEP-6 transfer, we have to figure out where to discover that information. Fortunately, the SEP-1 protocol describes standardized fields to find out what we need.
/src/lib/stellar/sep1.js
// Fetches and returns the endpoint used for SEP-6 transfer interactions.
export async function getTransferServerSep6(domain) {
  let { TRANSFER_SERVER } = await fetchStellarToml(domain);
  return TRANSFER_SERVER;
}
Source: https://github.com/stellar/basic-payment-app/blob/main/src/lib/stellar/sep1.js
Get /info
/infoNow that we know where the transfer server is located, BasicPay needs to fetch the /info endpoint from the anchor's transfer server to understand the supported transfer methods (deposit, withdraw, deposit-exchange, and withdraw-exchange) and available endpoints, as well as additional features that may be available during transfers.
NOTE
At this time, BasicPay only supports the deposit and withdraw transfer methods. A future version of this tutorial will incorporate the *-exchange transfer methods.
/src/lib/stellar/sep6.js
import { getTransferServerSep6 } from "$lib/stellar/sep1";

// Fetches and returns basic information about what the SEP-6 transfer server suppports.
export async function getSep6Info(domain) {
  let transferServer = await getTransferServerSep6(domain);
  let res = await fetch(`${transferServer}/info`);
  let json = await res.json();
  return json;
}
Source: https://github.com/stellar/basic-payment-app/blob/main/src/lib/stellar/sep6.js
Display interactive elements
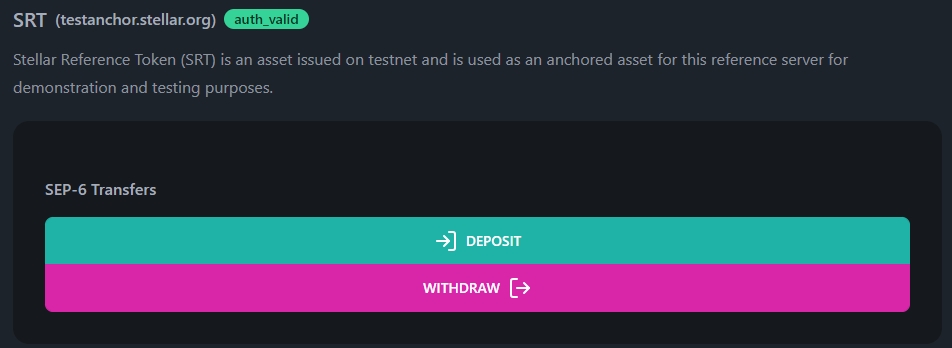
Since many of the SEP-6 (and SEP-24) endpoints require authentication, we wait until our user is authenticated with SEP-10 before we display what kinds of transfers are available. When they have a valid authentication token, we can display some buttons the user can use to begin a transfer.
The user can then initiate one of the transfer methods (in BasicPay, only deposits and withdraws are supported) by clicking the “Deposit” or “Withdraw” button underneath a supported asset.
/src/routes/dashboard/transfers/+page.svelte
<script>
  /* This <script> tag has been abbreviated for simplicity */

  // We import things from external packages that will be needed
  import { LogInIcon, LogOutIcon } from "svelte-feather-icons";

  // We import some of our `$lib` functions
  import { getSep6Info } from "$lib/stellar/sep6";

  // The `open` Svelte context is used to open the confirmation modal
  import { getContext } from "svelte";
  const { open } = getContext("simple-modal");

  /* ... */
</script>

<!-- HTML has been omitted from this tutorial. Please check the source file -->
Source: https://github.com/stellar/basic-payment-app/blob/main/src/routes/dashboard/transfers/+page.svelte
A special SEP-6 modal component
If you recall back to our confirmation modal section, we designed our modal component to be useful for anything we might require. Well, that's almost true. The fact is that SEP-6 interactions are just plain complex. To facilitate that complexity, we've created a purpose-built SEP-6 transfer modal. There is so much to it, that we couldn't possibly cover everything it does here. However, we'll cover the main bits and link to the relevant source files.
The modal component itself has been broken into several smaller Svelte components. Check out this source file to start looking through how we've put it together: https://github.com/stellar/basic-payment-app/blob/main/src/routes/dashboard/transfers/components/TransferModalSep6.svelte
Launching the SEP-6 modal
The above buttons will use the launchTransferModalSep6 function to display the modal to the user. Here's how it's defined in that same file.
/src/routes/dashboard/transfers/+page.svelte
<script>
  /* This <script> tag has been abbreviated for simplicity */

  // We import any Svelte components we will need
  import TransferModalSep6 from "./components/TransferModalSep6.svelte";

  // Launch the SEP-6 modal to begin the transfer process and gather information from the user.
  const launchTransferModalSep6 = ({
    homeDomain,
    assetCode,
    assetIssuer,
    endpoint,
    sep6Info,
  }) => {
    // Open the SEP-6 transfer modal, supplying the relevant props for our
    // desired type of transfer.
    open(TransferModalSep6, {
      homeDomain: homeDomain,
      assetIssuer: assetIssuer,
      transferData: {
        endpoint: endpoint,
      },
      formData: {
        account: data.publicKey,
        asset_code: assetCode,
      },
      sep6Info: sep6Info,
      // This `submitPayment` function is described later on.
      submitPayment: submitPayment,
    });
  };
</script>

<!-- HTML has been omitted from this tutorial. Please check the source file -->
Source: https://github.com/stellar/basic-payment-app/blob/main/src/routes/dashboard/transfers/+page.svelte
Once launched, the TransferModalSep6 will walk the user through a "wizard" to gather all the required information and ultimately create the transfer.
Modal step 1: Transfer details
BasicPay prompts the user to input additional information such as transfer type, destination, and amount. Some of this is prepopulated based on which button the user clicked. However, the user can change any of the fields if they so choose.
We'll spare the code sample in this section, since it's mostly Svelte things going on. You can view the source here: https://github.com/stellar/basic-payment-app/blob/main/src/routes/dashboard/transfers/components/TransferDetails.svelte

Modal step 2: Gather KYC information
To find out what infrastructure the anchor has made available for us to use, we need to query the anchor's SEP-1 stellar.toml file for the KYC_SERVER field. If this is not defined, BasicPay will fallback to using the TRANSFER_SERVER for these requests.
/src/lib/stellar/sep1.js
// Fetches and returns the endpoint used for SEP-12 KYC interactions.
export async function getKycServer(domain) {
  let { KYC_SERVER, TRANSFER_SERVER } = await fetchStellarToml(domain);
  // If `KYC_SERVER` is undefined in the domain's TOML file, `TRANSFER_SERVER`
  // will be used
  return KYC_SERVER ?? TRANSFER_SERVER;
}
Source: https://github.com/stellar/basic-payment-app/blob/main/src/lib/stellar/sep1.js
Our SEP-6 modal then queries the anchor’s SEP-12 endpoint for the required KYC fields with a GET request, and we present these fields for the user to complete.
 /src/lib/stellar/sep12.js
import { getKycServer } from "$lib/stellar/sep1";

// Sends a `GET` request to query KYC status for a customer, returns current status of KYC submission
export async function getSep12Fields({ authToken, homeDomain }) {
  let kycServer = await getKycServer(homeDomain);

  let res = await fetch(`${kycServer}/customer`, {
    method: "GET",
    headers: {
      "Content-Type": "application/json",
      Authorization: `Bearer ${authToken}`,
    },
  });
  let json = await res.json();

  return json;
}
Source: https://github.com/stellar/basic-payment-app/blob/main/src/lib/stellar/sep12.js
Again, the presentation of the fields the user must complete is more on the Svelte side of things, so we won't share those details here. However, the source for this component is available here: https://github.com/stellar/basic-payment-app/blob/main/src/routes/dashboard/transfers/components/KYCInformation.svelte
Modal step 3: Put KYC fields and report status
Now that the user has provided the necessary information for the KYC requirements of the anchor, we can submit them to the anchor's KYC server with a PUT request.
/src/lib/stellar/sep12.js
// Sends a `PUT` request to the KYC server, submitting the supplied fields for the customer's record.
export async function putSep12Fields({ authToken, fields, homeDomain }) {
  let kycServer = await getKycServer(homeDomain);

  let res = await fetch(`${kycServer}/customer`, {
    method: "PUT",
    mode: "cors",
    headers: {
      "Content-Type": "application/json",
      Authorization: `Bearer ${authToken}`,
    },
    body: JSON.stringify(fields),
  });
  let json = await res.json();

  return json;
}
Source: https://github.com/stellar/basic-payment-app/blob/main/src/lib/stellar/sep12.js
BasicPay receives back from the anchor a status message for the user to see. Once the status message is ACCEPTED, we can finally submit the actual transfer request!

This component of the SEP-6 modal, like most of them, is almost entirely Svelte-related. So as to keep this tutorial (somewhat) uncluttered, we'll refer you to the source for the component, which you can find here: https://github.com/stellar/basic-payment-app/blob/main/src/routes/dashboard/transfers/components/KYCStatus.svelte
Modal step 4: Submit transfer
BasicPay makes this request by taking all the fields that have been collected during this process and wrapping them into a URL that contains query parameters: example
We submit a GET request to the URL with our authorization token in the headers, and the anchor takes it from there!
/src/lib/stellar/sep6.js
// Initiates a transfer using the SEP-6 protocol.
export async function initiateTransfer6({
  authToken,
  endpoint,
  formData,
  domain,
}) {
  let transferServer = await getTransferServerSep6(domain);
  let searchParams = new URLSearchParams(formData);

  let res = await fetch(`${transferServer}/${endpoint}?${searchParams}`, {
    method: "GET",
    mode: "cors",
    headers: {
      "Content-Type": "application/json",
      Authorization: `Bearer ${authToken}`,
    },
  });
  let json = await res.json();

  if (!res.ok) {
    throw error(res.status, {
      message: json.error,
    });
  } else {
    return json;
  }
}
Source: https://github.com/stellar/basic-payment-app/blob/main/src/lib/stellar/sep12.js
We then store the details of the transfer in the transfersStore store and display the transfer server's response to the user. We then wait for them to close the modal.
NOTE
The only reason we're storing anything about the transfer in BasicPay is to help us keep track of which anchors the user has initiated transfers with. Otherwise, we wouldn't be able query for a transfer history (like on the /dashboard page).
(Sometimes) Modal step 5: Send a Stellar payment
In a withdrawal transaction, BasicPay will also build and present to the user a Stellar transaction for them to sign with their pincode. Here we will finally get to move back to our "regular" modal that is so good at so many things!
/src/routes/dashboard/transfers/+page.svelte
<script>
  /* This <script> tag has been abbreviated for simplicity */

  // Define some component variables that will be used throughout the page
  let paymentXDR = "";
  let paymentNetwork = "";

  // After a withdraw transaction has been presented to the user, and they've confirmed with the correct pincode, sign and submit the transaction to the Stellar network.
  const onPaymentConfirm = async (pincode) => {
    // Use the walletStore to sign the transaction
    let signedTransaction = await walletStore.sign({
      transactionXDR: paymentXDR,
      network: paymentNetwork,
      pincode: pincode,
    });
    // Submit the transaction to the Stellar network
    await submit(signedTransaction);
  };

  // Builds a Stellar payment to present to the user which will complete a transfer to the Anchor.
  let submitPayment = async ({
    withdrawDetails,
    assetCode,
    assetIssuer,
    amount,
  }) => {
    let { transaction, network_passphrase } = await createPaymentTransaction({
      source: data.publicKey,
      destination: withdrawDetails.account_id,
      asset: `${assetCode}:${assetIssuer}`,
      amount: amount,
      memo: withdrawDetails.memo
        ? Buffer.from(withdrawDetails.memo, "base64")
        : undefined,
    });

    // Set the component variables to hold the transaction details
    paymentXDR = transaction;
    paymentNetwork = network_passphrase;

    // We close the SEP-6 modal, and open the regular confirmation modal
    close();
    open(ConfirmationModal, {
      transactionXDR: paymentXDR,
      transactionNetwork: paymentNetwork,
      onConfirm: onPaymentConfirm,
    });
  };

  /* ... */
</script>

<!-- HTML has been omitted from this tutorial. Please check the source file -->
Source: https://github.com/stellar/basic-payment-app/blob/main/src/routes/dashboard/transfers/+page.svelte
SEP-24: Hosted Deposit and Withdrawal
SEP-24 provides a standard way for wallets and anchors to interact by having the user open a webview hosted by an anchor to collect and handle KYC information. In this integration, a user's KYC information is gathered and handled entirely by the anchor. For the most part, after the anchor's webview has opened, BasicPay will have little knowledge about what's going on.
INFO
Remember, SEP-24 depends on SEP-10 authentication. Everything below assumes the user has successfully authenticated with the anchor server, and BasicPay has access to an unexpired authentication token to send with its requests.
Find the anchor's TRANSFER_SERVER_SEP0024
TRANSFER_SERVER_SEP0024Before we can ask anything about how to make a SEP-24 transfer, we have to figure out where to discover that information. Fortunately, the SEP-1 protocol describes standardized fields to find out what we need.
/src/lib/stellar/sep1.js
// Fetches and returns the endpoint used for SEP-24 transfer interactions.
export async function getTransferServerSep24(domain) {
  let { TRANSFER_SERVER_SEP0024 } = await fetchStellarToml(domain);
  return TRANSFER_SERVER_SEP0024;
}
Source: https://github.com/stellar/basic-payment-app/blob/main/src/lib/stellar/sep1.js
Get /info
/infoOur application will request the /info endpoint from the anchor's transfer server to understand the supported transfer methods (deposit, withdraw) and available endpoints, as well as additional features that may be available during transfers.
 /src/lib/stellar/sep24.js
// Fetches and returns basic information about what the SEP-24 transfer server supports.
export async function getSep24Info(domain) {
  let transferServerSep24 = await getTransferServerSep24(domain);

  let res = await fetch(`${transferServerSep24}/info`);
  let json = await res.json();

  if (!res.ok) {
    throw error(res.status, {
      message: json.error,
    });
  } else {
    return json;
  }
}
Source: https://github.com/stellar/basic-payment-app/blob/main/src/lib/stellar/sep24.js
The user clicks "deposit" or "withdraw"
Now that we have all the SEP-24 information the anchor has made available to us, it's up to the user to actually begin the initiation process. In BasicPay, they do that by simply clicking a button that will then trigger the launchTransferWindowSep24 function.
NOTE
This file was pretty heavily covered in the SEP-6 section. We'll be presenting here the additions we make to this file, though we won't repeat things we've already covered. Remember to check the source files for the full picture.
/src/routes/dashboard/transfers/+page.svelte
<script>
  /* This <script> tag has been abbreviated for simplicity */

  // Launch the interactive SEP-24 popup window for the user to interact directly with the anchor to begin a transfer.
  const launchTransferWindowSep24 = async ({
    homeDomain,
    assetCode,
    assetIssuer,
    endpoint,
  }) => {
    // We initiate the transfer from the SEP-24 server, and get the
    // interactive URL back from it
    let { url } = await initiateTransfer24({
      authToken: $webAuthStore[homeDomain],
      endpoint: endpoint,
      homeDomain: homeDomain,
      urlFields: {
        asset_code: assetCode,
        account: data.publicKey,
      },
    });

    /* ... */
  };
</script>

<!-- HTML has been omitted from this tutorial. Please check the source file -->
Source: https://github.com/stellar/basic-payment-app/blob/main/src/routes/dashboard/transfers/+page.svelte
Retrieve the interactive URL
BasicPay then initiates a transfer method by sending a POST request to either the “SEP-24 Deposit” or “SEP-24 Withdraw” endpoint. The anchor then sends an interactive URL that BasicPay will open as a popup for the user to complete and confirm the transfer.
/src/lib/stellar/sep24.js
// Initiates a transfer using the SEP-24 protocol.
export async function initiateTransfer24({
  authToken,
  endpoint,
  homeDomain,
  urlFields = {},
}) {
  let transferServerSep24 = await getTransferServerSep24(homeDomain);

  let res = await fetch(
    `${transferServerSep24}/transactions/${endpoint}/interactive`,
    {
      method: "POST",
      mode: "cors",
      headers: {
        "Content-Type": "application/json",
        Authorization: `Bearer ${authToken}`,
      },
      body: JSON.stringify(urlFields),
    },
  );
  let json = await res.json();

  if (!res.ok) {
    throw error(res.status, {
      message: json.error,
    });
  } else {
    return json;
  }
}
Source: https://github.com/stellar/basic-payment-app/blob/main/src/lib/stellar/sep24.js
Launch the popup window and listen for a callback
BasicPay doesn't really need (or want) to know everything that's happening between the user and the anchor during a SEP-24 transfer. However, we do want to know when the interaction is over, since we may need to take some action at that point. So, we add a callback to the interactive URL and open the popup window.
CAUTION
Since BasicPay is an entirely client-side application, we can't provide a callback as a URL. So, we are using a postMessage callback. For more information on the details of these callback options, check out this section of the SEP-24 specification.
/src/routes/dashboard/transfers/+page.svelte
<script>
  /* This <script> tag has been abbreviated for simplicity */

  // Launch the interactive SEP-24 popup window for the user to interact directly with the anchor to begin a transfer.
  const launchTransferWindowSep24 = async ({
    homeDomain,
    assetCode,
    assetIssuer,
    endpoint,
  }) => {
    /* ... */

    // We add our callback method to the end of the URL and launch the popup
    // window for the user to interact with
    let interactiveUrl = `${url}&callback=postMessage`;
    let popup = window.open(interactiveUrl, "bpaTransfer24Window", "popup");

    // We listen for the callback `message` from the popup window
    window.addEventListener("message", async (event) => {
      /* ... */
    });
  };
</script>

<!-- HTML has been omitted from this tutorial. Please check the source file -->
Source: https://github.com/stellar/basic-payment-app/blob/main/src/routes/dashboard/transfers/+page.svelte
Complete transfer
Once the user is finished with the interactive window from the anchor, they'll be brought back to BasicPay. We store the details of the transfer in the transfersStore store (remember, this is just so we can track which anchors to query for transfers later on).
/src/routes/dashboard/transfers/+page.svelte
<script>
  /* This <script> tag has been abbreviated for simplicity */

  // Launch the interactive SEP-24 popup window for the user to interact directly with the anchor to begin a transfer.
  const launchTransferWindowSep24 = async ({
    homeDomain,
    assetCode,
    assetIssuer,
    endpoint,
  }) => {
    /* ... */

    // We listen for the callback `message` from the popup window
    window.addEventListener("message", async (event) => {
      // Close the interactive window if it's not already
      popup?.close();

      // Store the transfer in the browser's localStorage
      transfers.addTransfer({
        homeDomain: homeDomain,
        protocol: "sep24",
        assetCode: assetCode,
        transferID: event.data.transaction.id,
      });

      /* ... */
    });
  };
</script>

<!-- HTML has been omitted from this tutorial. Please check the source file -->
Source: https://github.com/stellar/basic-payment-app/blob/main/src/routes/dashboard/transfers/+page.svelte
(Sometimes) Send a Stellar payment
In a withdrawal transaction, BasicPay will also build and present to the user a Stellar transaction for them to sign with their pincode.
/src/routes/dashboard/transfers/+page.svelte
<script>
  /* This <script> tag has been abbreviated for simplicity */

  // Launch the interactive SEP-24 popup window for the user to interact directly with the anchor to begin a transfer.
  const launchTransferWindowSep24 = async ({
    homeDomain,
    assetCode,
    assetIssuer,
    endpoint,
  }) => {
    /* ... */

    // We listen for the callback `message` from the popup window
    window.addEventListener("message", async (event) => {
      /* ... */

      // If the user has requested a withdraw with the anchor, they will
      // need to submit a Stellar transaction that sends the asset from
      // the user's account to an account controlled by the anchor.
      if (event.data.transaction.kind === "withdrawal") {
        // Generate a transaction with the necessary details to complete
        // the transfer
        let { transaction, network_passphrase } =
          await createPaymentTransaction({
            source: data.publicKey,
            destination: event.data.transaction.withdraw_anchor_account,
            asset: `${assetCode}:${assetIssuer}`,
            amount: event.data.transaction.amount_in,
            memo: Buffer.from(event.data.transaction.withdraw_memo, "base64"),
          });

        // Set the component variables to hold the transaction details
        paymentXDR = transaction;
        paymentNetwork = network_passphrase;

        // Open the confirmation modal for the user to confirm or reject
        // the Stellar payment transaction. We provide our customized
        // `onPaymentConfirm` function to be called as part of the
        // modal's confirming process.
        open(ConfirmationModal, {
          transactionXDR: paymentXDR,
          transactionNetwork: paymentNetwork,
          onConfirm: onPaymentConfirm,
        });
      }
    });
  };
</script>

<!-- HTML has been omitted from this tutorial. Please check the source file -->
Source: https://github.com/stellar/basic-payment-app/blob/main/src/routes/dashboard/transfers/+page.svelte
Last updated